Shooting Video with a Smartphone

Were you assigned a video project in one of your classes this semester? No need using a bulky video camera to record your video, just use a smart phone! This tutorial will give you some basic tricks as well as point out some useful tools UTSA Libraries has available for checkout that will help you to produce a more professional looking video.… and hopefully get an  A+ on that video project!
1. But which way do I hold my phone?

When going to shoot your video, should you hold your phone in horizontal or vertical orientation? When taking still photos, shooting between landscape or portrait is no big deal, but with video – it’s a different story.
As a rule of thumb, you should always shoot in landscape mode to avoid those black bars on your screen.

2. Can you hear me now!?

Nothing ruins a great video like lousy audio. One simple idea is to grab an extra smartphone and place it just out of frame, hit record, and start recording your video. Then while editing, just delete your original video’s audio track and instead overlay the phone audio as your sound source. Voila! Crisp, detailed dialogue. And don’t forget one of the oldest cinematic tricks in the book to help pair your audio and video tracks perfectly: Once you start recording, clap your hands loudly once, then wait another second to start talking. This will create a spike in the audio waveform that you can use to sync your audio tracks later during the editing process.

Available for checkout at UTSA Libraries:

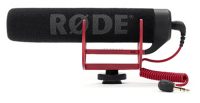
RODE VideoMic GO 
This is an external microphone that is compatible with most smart phones and available for check out.

Microphone

3. No more shaky videos!

Most smartphones have a built-in stabilizer, which can take some of the shake out of your video. But even with this built-in magic you’re going to want some extra help to keep your phone still. The most basic technique to sturdy your phone is to squeeze your elbows into your torso while shooting. Another option is to just find a sturdy surface like a table or ledge to use as support for your phone.

Available for checkout at UTSA Libraries:

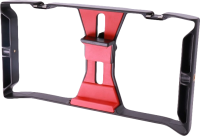
Smartphone Video Rig
New U Rig Pro with 3 standard shoe mounts and 2 universal 1/4 inch-20 threads. Allows you to mount LED lights, video microphone and more to the Rig. This is a fantastic tool for mobile video makers.

Rig

4. Let there be light!

In good light, most smartphones shoot great video, but when you’re in the shade, or indoors, be aware of your light source. Is your subject one big shadow? This could be because of where your subject is positioned. To prevent this, move your subject toward the light to brighten them up. Once you have your subject in a good spot, you can fine-tune the brightness by adjusting the exposure. Tap on the spot where you want to focus and then slide the brightness icon up or down until you have your lighting just right.

Available for Checkout at UTSA Libraries:

Mini LED Video Light Kit
This is an external sources that is compatible with most smart phones. The mini LED light can also be easily mounted to our Smart Phone Video Rig, thus providing you with a handsfree extra light source.

Light

5. Using the Rule of Thirds

Finally, centering your image is easy enough, but not everything has to be in the middle of the frame. In fact, lining up parts of your subject on thirds can make your compositions more interesting. this is called the Rule of Thirds. Imagine drawing a tic-tac-toe grid on your phone screen and aligning your image on the intersection of those lines.

These are small changes that’ll make a big difference when it comes to shooting your video project.